A turn is not just a turn! By knowing the various types of turns, it will be easier to identify which types are challenging for the rider. A good section can contain several types of turns, and as the child gains skill, you might combine the different the types of turns with other types of obstacles.
High-Degree Turns in Trial
It sounds basic, but most turns increase in difficulty the sharper the curve is. A good 90-degree or 180-degree turn can be a good obstacle in many sections, and can be a challenge to most riders if done correctly.
For Toddler and Junior riders, a 90-degree turn is often a serious challenge. It takes good concentration and balance. At the same time, the rider must control acceleration in the turn, and in certain cases braking before entering the turn.
These are all things requiring machine control, and therefore it is a good exercise. Thus, it is important not to underestimate a 90-degree turn – especially for young or new riders.
It becomes even more difficult when we are talking about 180-degrees – meaning a turn where the rider must turn the bike 180 degrees and go opposite the earlier direction of travel. This requires significant concentration and balance, and for most of the very young riders, it can be quite a handful. Make sure you leave room in the section for a large turn radius, because the rider will need it.
In the beginning, however, it is appropriate to start with turns under 90 degrees. A 45-degree turn will provide plenty of challenge, especially if you place several after each other.
Positive-Camber or Off-Camber Turns
When turning on a hill, the turn can either be positive camber or off camber. This can also be defined as turning while going up- or downhill. It is obvious that having to turn on a hill is more difficult than doing so on level ground.

A turn with positive camber means that hill slopes toward the inside of the turn. An example of this is when you turn on your way up a hill and the turn brings you back down the hill. The rider is “helped” by the slope of the hill, as it doesn’t come naturally for the front wheel to skid.
Although the slope of the hill helps the rider turn the bike, it is not necessarily easier than turning on level ground. Often, the challenge lies in the mental task of having to turn back down the hill.
Depending on the slope of the hill, this can be more or less challenging for the rider. It differs greatly from one rider to the next, how they handle a positive-camber turn – some are fine with it, others feel challenged. All you can do is try it out and see if it is something that needs work.
An off-camber turn is a turn where the hill slopes with the outside of the turn. This is a turn where the rider is going downhill, and the direction of the turn goes back up the slope.
Off-camber turns are notoriously difficult for the rider. There is something mentally difficult about having to turn while going downhill, that causes most riders to freeze.
In addition, it is also natural for the motorcycle to want to skid towards the outside of the turn.
When that happens, the motorcycle will skid away from the rider, which will often result in a crash.
You will usually find an off-camber obstacle in the Trial Section, and it is, in fact, a good obstacle for the children to practice.
Start small, however, and find slopes that are not too steep. It doesn’t have to be a slope of more than 5-10 degrees inclination before you get an effect.
Then build up the slope by increasing the angle/slope continuously, as the child can handle it.
Both positive- and off-camber turns can be made more difficult by increasing the turn angle as described above under the section “High-Degree Turns”.
The Perfect Trial Turn.
There are plenty of different lines the child can follow through a turn. Generally speaking, the one that suits the child best and creates a turn without touching the ground is the right line.
That being said, there may be some lines that are more appropriate and which make it easier for the child.
The first rule is to utilize the entire width of the turn. Unlike anything else in motorsport, Trial is not about following the shortest line through a turn. On the contrary, it is about teaching the child to take the line that most facilitates getting through the turn with the bike fully balanced. This line will often be the one that requires as much space as possible available in the turn.
The advantage of taking the turn this way is that there will be no sharp angles at the end of the turn. The sharper the turn, the more pronounced this is. Therefore, make it a rule to use the entire turn.
This doesn’t quite come naturally to riders, as the rider will often try to take the turn quickly, therefore taking the short way through the turn.

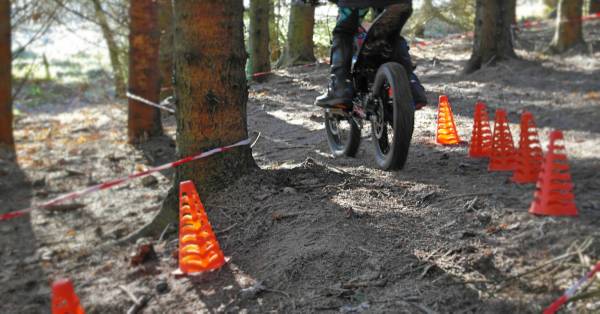
Use Cones to Help Find the Lines in Trial.
The cones can be set up as obstacles to ride around, such that the rider is forced to ride a certain route. This way, you can get the rider to select a certain line.
Another way of using the cones is by creating gateways for the rider to follow.
This is done the same way as when training on level ground – you may want to refer to Cone Training – PART II – Steering Exercises. This method may be better in the beginning, providing the rider with some familiarity.
This method also contributes to forcing the rider to take a given line through the turn.
Our preferred method is to set up cones in the section that show the perfect line.
I never start by setting up the cones, but rather allow the rider to run through the section several times first.
After this, the cones are placed in a way that shows the rider the perfect line / forces the rider to follow a particular line. Gradually, you can then remove the cones – first every third one, then every other, and finally, there are just a few cones left. This way, the rider can gradually get used to taking the desired line through the turn.